Wednesday, June 8, 2011

Progress has been made

Today was a good day. It started a bit rough, but by the end of the day I was feeling pretty good. I tend to listen to photography podcasts while I work. Today I chose to listen to one about a photographer who purchased a Rebel XT (like mine) back in 2005 (Me too!). This photographer has no formal training (not much here either, only 1/3 of the way thru NYIP Pro Course) and little money at the time for extra gear (bingo). For all intensive purposes, it could have been me, with one big exception. These images popped. Lots of color, interesting subjects, fun to look at images. I was furious. I have been struggling, no pleading with my XT to give me some color, some life to my images. I want to do as much in camera work as I can so I do little post processing at a computer (where I will get sucked into the infinite possiblitites of post production tweaks). As of yet it has never happened for me. All I want are a few images where someone stops and utters the quiet, under the breath "ooooohhh". Just once I wish to stop someone in his or her tracks without prompting them for a compliment. This photographer has it, with the same camera I have been fighting with for years. Which of course means only one thing. Yup, it is me and not the camera. Now I am certain that the colors and 'pop' that I am looking for are in these images, I simply do not know how to coax them out of my camera. So I broke down and began the long and winding trek into post processing. Thanks to a different podcast, I had recently watched a brief tutorial about Nik's Color Effect software. So I pulled up a chair and tried it.


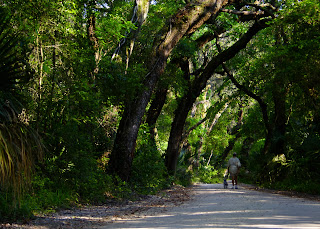
This is one of the few images I have taken where I was really excited to see it in print. Everything just works in my opinion. The man walking his dog is the subject of the photo, and everything else in the image supports this. The dirt road and leaves that line the left side lead you to the pair, the green trees lean in and frame them, and the sunshine at the end of the road draws your eye to them. However, Nik's software really made this image come to life. It boosted the foliage color and added brightness and warmth that simply was not there before. I do not know why I cannot get colors like this straight from the camera, but with great software like this I no longer care as much. I was able to complete post production on five images in under an hour.


So with that, Unit Two is complete. I has been sent away for critique and I move on to Unit Three. I look forward to opening up my assignment sheet to see what is next. So until next time, thanks for reading.


Joe

Tuesday, May 31, 2011

Another trek to the beach


So I made another sunrise run down to the beach. I set my alarm properly this time so I had plenty of time to set up. Too much time actually. The whole reason I came down to the beach was to take photos of the moon. For some reason the crescent moon caught my eye, and if it had not I would have easily crawled back into bed.
As I stood on the boardwalk in the pitch dark waiting to see where the sun was going to rise, I decided to try some long exposure photography. The shot you see here is a 30 second exposure which is why the clouds and ocean waves are slightly blurry. It is kind of funny because I had no intention of doing a photo like this, but it ended up being the best of the bunch I took that morning.
I did very little post production on this, and I am not sure if I will. I bumped up the colors a bit to make it a bit more 'punchy', and I cropped out a ship from the left horizon. I have considered trying other techniques, but in all honesty I do not think I will like anything more than what you see here. The colors are warm and inviting, the setup is fine, and I can do little with the blurry clouds (and would not attempt do do anything with the ocean). Why fix something if it is not broken, right?

Well, one week down. Yes it was a day later than I expected, but Monday was a holiday so it does not count against me. I plan on finishing my last of three photos to submit to NYIP for Unit Two, nd with any luck I will post them here for your review as well.

As always, thank you for reading.

Joe

Monday, May 23, 2011

Yes, another Hiatus

Well, I went and did it again. I went and had another photography slump. I will be honest, I was about 2 days away from selling everything I had to upgrade to a new camera. I cannot say for certain why it is I want a new camera so bad. Yes, there are some things I simply cannot accomplish with my current camera. I cannot tether the Rebel XT to a computer running Windows 7. I wonder if the colors are better from a newer camera. All that aside, there is no reason I cannot use the camera I have to take awesome pictures and the only thing holding me back is me. So I woke myself up early Sunday morning and decided to act like a photographer and capture the best light of the day...Sunrise.

I love the colors from the rising sun, and I love how they reflected off the wet sand. I feel the posts add interest to the image. However, something is not right. The problem is I do not actually know what is wrong. I sat in front of my editing software and could not bring myself to do anything with this image. I could not crop it, I could not adjust colors, and I could not photoshop i in any way that I felt improved the image. I would never be bold enough to say it does not need anything, but whatever it is eludes me.

So now that I am back on the wagon again I vow to make a posting once a week, preferably on Monday. I will include what I feel is my best work from the week before. Hopefully I will show some improvement along the way.

Thanks for being patient, and as always...Thanks for reading.

Joe

Monday, April 11, 2011

Sudden fascination with Panorama

I was able to go off and shoot freely Sunday at a nearby plantation. I have been studying a few different photo books and became obsessed with making panorama shots from multiple images. The one below is about 20 images splices together in Photoshop:
I should spend a bit more time with the pre-processing of the image. It is essentially a 180 degree compilation so the exposures were different as I went from left to right. You can see the nice blue sky above the tree, but the sky is blown out over the plantation house (where the sun was in the sky). However, what you see above you is about 10 minutes of total processing, which is how long PS takes to work with 20 RAW images. I did nothing to them prior to sending them thru photomerge. But it is a blast and the results are not too bad.

Short post today, but thanks for reading.

Joe

Thursday, March 31, 2011

Last Minute Chance

Sometimes it just helps to be lucky instead of good. I was taking out the trash and noticed the cloud cover just after a rainstorm. Yeah, it was a moment I should have been prepared for, but some days are better than others. I grabbed my camera and ran to the pond across the street. I tried to keep in mind some things from my NYIP class. One, I need to add something to the foreground to give the image depth. Two, I wanted something to draw he viewer into the image. Three, I needed to make sure I had a small aperture in order to provide the greatest depth of field. It is not a Picasso, nor will I frame it and hang it on a wall, but I think I may submit this for my leading lines assignment in Unit Two.

Once again, thanks for reading.
Joe

Saturday, March 19, 2011

Moon

Well, I went out and tried to shoot the moon as it passed closer to earth than it has since the mid 90's. More frustrating than anything else, since no matter what I did I simply could not get good exposure or composition. I wanted a shot of the moon reflecting off the pond but could not get anything without blowing out both the moon and the reflection.

I was able to save the photo below. It is OK, but rather boring. I would have liked to include some foreground objects to provide some type of compliment to the moon, but to do that I needed to zoom out and the moon became to small to provide interest. So I simply focused on the moon and took a few dozen shots until I thought I had something reasonable. Reasonable is what you see below.

Thanks for reading.

Joe

Thursday, March 17, 2011

Another try with the water drops

So you more than likely have seen these images before. A zoomed in shot of a drop of water splashing into a tray of water with some awesome colors and great interactions. The image posted here is my most recent attempt, but it is not why I am posting today. Last night I received my new tripod and I wish to officially thank Ravelli APGL4 for making such an awesome tripod. It is sturdy, strong, tall, and came with a pistol grip ball head. The only reason i am upset is because I waited so long to grab one. I may have picked up the last one. Amazon sold out as of today, with no plans to restock. Sad. I set it up last night and it was rock solid. It is bulky but not heavy as stated in the reviews. I would not think twice about taking it with me on a routine day trip. I am 6'1" and had to lower the legs so I could look in the viewfinder, even when my camera was tilted 90 degrees. No more hunching for me!

Well, that is about it. I am taking my camera and new tripod out and start working NYIP Unit two!

Again, thanks for reading.
Joe

Wednesday, March 16, 2011

Seen one of these?

I just started NYIP Unit 2, and as I was perusing the kit I noticed a 18% gray card with it. A gray card is used to help set white balance for a scene. This got me thinking about some other, more fancy color cards online, specifically the one made by xrite. Seems like a great idea. I already own a calibration tool for my monitor and I swear by it. The issue I have is how do I streamline the whole process? How to get color I see in camera to match what I see on screen, to what is printed out. Hopefully this would help simplify things. However, IT IS $100!!! Sorry, no can do pal. I can drop $90 for a great tripod (in the mail, review later this week), and I have considered saving up for a new camera body ($500 to $1,500 depending on my mood). But I just cannot part with a Benjamin for something like this, especially when I can do it myself!

I went to the hardware store to see if they had some kind of paint color wheel. Yeah, that was too easy. Well, I had the entire freaking rainbow to choose from in the sample cards provided by the paint retailers (Free BTW!). The hardest selections were the black and white cards. I had to grab a white card and compare it to other white cards to see which was the true white, and the same with black. For the colors, of course nothing is labeled like you would want (Crayola colors would be nice). There was no true blue or green or orange. I had plenty of sunshine gold or harvest wheat, just no yellow. So I grabbed as many of each color (lucky for me each sample card had 3 similar colors). Now all I needed was something rigid yet flexible to mount them on. I found the ideal medium in the signs department, you know like the plastic yard sale signs. I grabbed a tow away zone sign for $5 and took 45 color samples home with me. I cut the samples into one inch squares (except for the black and white ones which I mistakenly assumed were the two most important colors), which I made one by two. More on that later.

I simply arranged the one inch squares into a pattern I found appealing and proceeded to use spray adhesive to mount them on the plastic. Once in the grid, I needed a bumper to both segregate the colors and protect the card itself from getting dirty or damaged. Fortunately my wife had purchased some craft foam, and I swiped a sheet of black (similar to the stuff some people use on a flash to direct the light). This was the longest part of the project because a wrong move could slice a grid right off. So I cut squares with a quarter inch border between each, sprayed it with adhesive and slowly made sure to line up the seams so they did not show. Finally I trimmed the plastic even with the foam and ta-dah! One color checker card for under $5.

I also made a smaller version, about half the size of a credit card. I used a hole punch and obtained a sample from each color I had in the large checker, then punched holes in a strip of leftover foam. I mounted it on a piece of plastic, then put a bit of glue on the back of each punched out color circle. I placed it in a hole and smoothed it down with the end of a bamboo skewer. Done. Ten minutes max and I can use it with my macro photography.

Alright, so now the bad news. I assume that the colors used in the official color checker are standardized, or at least a known color value. I am sure they also have software that calibrates to this known value. I do not. I have 26 colors that I thought looked like what I wanted, and using these colors I eyeball them on my monitor and hope for the best. When I loaded these up on my computer they initially looked decent, and Lightroom allows me to use the eyedropper tool to select a color to change the overall temperature of the image. When I clicked on the white sample little happened. Upon further investigation I discovered that I was supposed to select a neutral color, not white. This is where a known 18% gray color would come in handy. I have three shades of gray, but I have no idea how close to 18% any of them are. However, through experimentation I discovered that using the gray samples made significant changes to the color samples. The colors just leaped of the monitor! So fine, I do not have the fancy software or the carrying case for my color checker. What I do have is $95 in my pocket and a pretty decent tool in my arsenal. I am cool with that.

If I did it again there is not much I would do different. I would look into finding a better way to make holes in the foam, perhaps a punch of some sort. The only thing I do not like is how the foam came out uneven and unprofessional. A punch would fix this, and I like how the circles look on the small card. But I do not own a punch so it would drive the cost of this project up a little.

Once again, thanks for reading.
Joe
Sunday, March 13, 2011

Unit One Done!

Finally, after months (OK, years...but that is a different story) I have finally completed my NYIP unit one photos! They go out in the morning, no if's and's or but's about it. For reference below are my three images, the first stopping motion using a fast shutter speed. The second is using selective focus to place focus on a subject, and the third is showing a large Depth of Field (DoF) in an image.


The first image was difficult in the fact that I limited my DoF to such a small area. I did this to blur the background and place the focus on the frisbee. However, to do this I had to capture the frisbee in an imaginary box that was about four inches deep. Any idea how hard it is to hit an area around four inches deep with a frisbee? My wife does (thank you beautiful!). The second image was more of an afterthought. The morning I took thi photo there was a low lying fog across the golf course and I went out to capture the interaction with the fog and the sunrise. Unfortunately there was no real interaction so I turned my attention to the golf ball. I tried to show the image in a unique perspective which I feel made the difference between ordinary and something more. For the third, it was a pet project. Once I read the requirements for this assignment the first thing I though of was soldiers storming the beach. In the end, I should have abandoned the idea as an assignment and came back to it on my own later. I could not achieve the long DoF I wanted and still get close enough to the toy soldiers to show real detail. I did not want them to feel small even though they are only an inch tall. I was unable to blend both the closeness I wanted with the DoF I needed and I think the image may have suffered because I refused to simply move on to a new subject. Oh well, you learn from your mistakes.

Thanks for reading.
Joe

Tuesday, March 8, 2011

Creating a Photobox, Day Two

I need to clarify some things before I continue with my project. I am not a carpenter. I am sure there are better ways to build a box, but this is how I chose to do it, either due to tools I had on hand or with the experience level I am comfortable at. If you choose to undertake a project such as this, I welcome you to use this as a guide. I will try to help you avoid some pitfalls along the way, but in the end this is your project and feel free to adapt it as you see fit.

Day two starts with finish up the jigsaw work to make the holes in the top and sides of the photo-box. Once this is done it is time to make a decision. You can either add the hardware to assemble the box now, or wait until after the muslin is attached. I chose to put the muslin on first thinking the hardware would help hold it in place.

I assumed this would be the most difficult task of the project. I was afraid I would rip the muslin, have it somehow be off center, or simply not be taut enough and look bad. I was surprised that the process was not too bad. I used my air compressor and nail gun to drive staples into the MDF. I worked down the full length of a short side first, then pulled the muslin tight across the hole and put a single staple in the opposite side of the MDF to hold it in place. From there I went to the long side and methodically worked my way up each side pulling taut as I went. I switched sides every other staple so i could work evenly up the face of the board. I did not worry about wrinkles across the board since I could tighten them up from the last edge.

I should not have to say it, but make sure your work space is CLEAN before working with the muslin. I have no idea how to clean the muslin once it is mounted on the board. So now that the muslin is taut, I flip the board over, trim the excess, and use some spray adhesive I had from another project to keep the edges flat and out of the way. If you choose this be wary of spraying the exposed muslin, hard glue would more than likely cast a shadow.

Now comes the most frustrating part of this whole exercise. Assembling the box should have been fairly simple and I managed to butcher the whole process. The first smart thing I did was to put scotch tape over the spot where I was going to drill through muslin. I liken this to putting a pin through a balloon. The tape kept the muslin from wrapping around the drill bit. I drilled four holes through both the top and back, and matched the holes to a half inch hole on each side. So a hole in each corner in the top and back panels, matching two holes in the top and back of each side panel. In each side panel hole I hammered in the furniture mount. These ended up being a bad choice as they simply slid out, making assembly a huge pain in the rear. I plan to replace these with something more durable. I do not think the screw type mounts will work since I think they are wider than the MDF.

That was it. Once everything is screwed together it comes out fairly nice. The opening is the same width as a sheet of poster board, which is extremely convenient when setting up the white infinity background. This of course was by sheer accident, but now that I see it in action I wish I would have planned for it. The box itself is bulky but not too heavy. Do not try to move it assembled too much. The first time I moved it I pulled out the mounting screws (Again). Below is the final setup, my overall 'studio' setup, and a sample infinity white background.
So once again, thanks for reading.
Joe

Monday, March 7, 2011

Creating a photobox, Day One.

Yes, it has been some time (again). A week away at sea and another week with my camera away to be cleaned, and here we are. So to keep my spirits up I took an idea I tried earlier and tried to make it better and more 'permanent'. Some time ago I tried to build a light box or photo-box out of cardboard and tissue paper. Strobist.blogspot.com provided a well written guide to create a simple photo-box, and it worked fairly well. The issues I had were that it simply was not large enough, and it did not collapse so even though it was not large, it was big enough to take up space.

So my idea is to create a 24"X24"X18" wooden box that I can take apart when not in use. I started with a 4'X8' sheet of Medium Density Fiberboard (MDF). I had the store rip it down to four 2'X4' sheets so I could get it home in my car. I also purchased eight machine screws and eight furniture locks (explained later). In theory I should be able to thread the machine screws into the locks and remove them without damaging the MDF. I considered hinges, but the puzzle I would need to create in order for it to fold flat when not in use was well beyond my skill level. I also picked up some white muslin fabric from the fabric store. So far I am in this project for about $60. Honestly, the MDF was half of that, but I used half of the sheet for a different project. So let's call it $45 and some hard labor.

I cut the back to 24"X24", the top to 18"X24", and the sides to 17.25"X24". Once assembled it should measure 18"X24"X24". From there I needed to cut out the holes in the sides and top. My first mistake was to try and round the edges of the hole. I thought it would make it stronger and honestly believed it would be easier with holes to start cutting from. I used a circular door cutter used for installing door locks to start with. It was about two inches in diameter and looked good, but it was extremely difficult to handle and created a ton of smoke. So I turned to a simple one inch bore hole driller. The holes are obviously smaller, but it was much easier to use and the corners are rounded better than before. From there I used a jigsaw to cut the straight lines from hole to hole.


That was enough for one day. So far this has taken about 90 minutes from start to stopping point. Tomorrow I will finish cutting holes in the the second side and top. The back will remain solid. Once the holes are complete I will cover them from the inside with muslin. Also, my camera returned today so I will need to find some time to work on my NYIP homework. I need to finish my Unit One assignments and submit them for review. Real life keeps getting in the way. Until tomorrow...

Thanks for reading.
Joe

Tuesday, February 8, 2011

Direction, also known as where do I go from here

I started this blog some time ago as a means to make myself work to become a better photographer. Judging from the timespan between posts it is obvious it didn't work as well as I had planned. Why is that? I think it is fair to say I enjoy creating images since I have gone to great lengths in order to improve my craftsmanship. Yes when it comes down to it, I always find something else to focus my efforts on. Even if I can work on photography it is rarely the same thing. One week it is my NYIP classes (which I owe a ton of money to), the next I am reading on how to better use Lightroom. This week I am making Macro photos of water. In some cases the 'Jack-of-all-Trades' approcah would work well. Right now I feel lost and overwhelmed with no idea where to start. Perhaps if I air out the pros and cons here I can shed a little light on whhere to turn.

NYIP: I signed up for the course in order to improve my overall quality of photography. What better way to become a better photographer than to have an industry leader teach you the fundamentals, how to apply them and when. The price is steep but I believe it will be well worth it in the end. I cannot honestly answer why I do not sit down and work on the assignments. I read all of chapter one, took the online exam, watched the DVD for unit one, and even took my first picture for submission to NYIP. I have two more images I must capture to complete unit one, yet I just have not made the time to capture them. I guess I am afraid of what will be said in response of my submission. It is simply time to push thru and take my constructive criticism.

Lightroom Training: I love Lightroom, or at least the idea of what Lightroom can do. I watch tutorials on before and after touch ups and the simple tweaks are amazing. I have access to a Lightroom training book which again teaches the fundamentals of using Lightroom and how to apply them. I have several issues with proceeding with this form of training. First of all, what good does photomanipulation do if it is simply a bad photo. So honestly I should learn to take better pictures BEFORE I edit them. Lastly, I have thousands of pictures I have taken from around the world. I could spend months simply editing them and organizing them. It is a daunting task and I am afraid to even start this massive undertaking.

Practice: I stumbled across a macro image of a water drop and instantly became inspired to pull out my camera. It was the first time in a very long time I even turned on my camera. I had a great time shooting these images, but I didn't capture perfect images. The time I spent shooting these images could have been better spent completing unit one and proceeding to unit two. However, it was fun. Isn't that what this should be about? Is it still a hobby if you do not enjoy the time you spend working on it?

Yes, this has been a bizarre post. Blogs are not supposed to be amazing insights into the future. It is simply a way for me to organize my thoughts and hold myself accountable for it. I know what I need to do, and this puts it in my face and hopefully gives me the drive to do it.

Thanks for reading.

Joe

Monday, February 7, 2011

Wow, six months.


Has it really been six months since my last post? I wish there were some wonderful story behind why I have been MIA for so long, but frankly it is laziness. I simply have not pulled out my camera for months. I made a New Years Resolution to finish my NYIP photo class, and become a better overall photographer. Even then, it still took another month for me to feel inspired and grab my camera. To the right here you see my first successful try at water droplet photography. I had a ton of fun with this. No matter how well prepared you are, no matter how much effort is put in to get 'that shot', it still comes down to luck and persistence. I took hundreds of photos, and each one there was a sense of excitement wondering what would be revealed when the shutter snapped. I think I captured a dozen keepers. Most others were either out of focus, poorly lit, or simply nothing there. However, when one looked good I smiled and could not wait to see it on a monitor. The one here is what I feel is the best of the bunch and I am pretty proud, and more importantly i am most inspired by.

The setup for this shot was fairly easy. I watched a short video (I think it was strobist.com) and followed those ideas fairly closely. I had a spare tripod so I attached a metal yardstick to it and supported the other end to make a square 'arc' for lack of a better term. From this I duct taped a Ziploc bag of water. I partially filled a clear glass Pyrex dish (the bigger the better) and placed it under the baggie (about two feet difference). Behind the setup I had a simple three fold cardboard stand, just like the one for a school project. For the camera setup I had a speedlite (Vivitar 283) off camera attached by a four foot spiral tether cord. This was the biggest hassle of the entire project. I should have spent a little more for a wireless setup, but it wasn't available at the store I went to and I wanted to work on the project over the weekend. If you do this I highly recommend spending the extra $20 and go wireless. For my camera setup, my only macro lens was a 75-300mm lens. So my camera was about four feet back from the setup. My speedlite was clamped so it flashed on the three fold cardboard and NOT the water itself. I set my Rebel XT to ISO 100, 6.3 aperture, and shutter speed of 1/200 (the fastest my camera and flash combination allowed).

With everything in place, I used a safety pin to punch a hole in the corner of the bag and allowed the water to get to a constant rate. I chose a dish that was too small so it was difficult to get an area where I did not have either an edge of the dish or the logo on the bottom of the dish in my image. Once everything was positioned and I had an idea of where I wanted to focus, I set my camera to focus only on the center of the screen instead of the entire area. Since i could not focus on the clear water, I had my wife hold a pen in the area I wanted to focus on, auto focused on that, then switched my camera to manual focus. Do not focus on where the water lands, but about the mid point of the splash. Looking back I should have used a wider aperture in order to allow more of the image to be in focus. A majority of my images were out of focus in part of the image ruining the entire shot.

So now the camera, lighting, and props are all set. The camera is focused, now simply fire away! There is no real way to anticipate the results, and that is part of the fun. Simply keep shooting, and check early and often to make sure the area you are shooting is in focus. Nothing is more disappointing than feeling like you captured the perfect image only to see part of the image out of focus on a larger monitor.

Well, I would like to tell you that I have more to follow. My short term goal is to finish the NYIP course chapter one photo requirements. I will post more often than the current six month interval, that is for certain.

Thank you for reading.